Monday, November 4, 2019

Preposition Power

Well hello there! It seems to have been awhile. I have been really good about posting over on my Instagram and FB blog pages and sometimes neglect this area, mainly because this takes a tad more time to get together. So if you have not followed me over yonder go for it! You will see more frequent posts and such! FB: The Blessed OCDiva Instagram: @theblessedocdiva


Preposition Power!

So 1st grade started teaching all about prepositions!
You may have your own way of introducing and teaching prepositions, so I am just going to share a few things I have done in the past as well as the little project to wrap it up.
This book is ADORABLE! 
Image result for farm preposition book
I had a copy gifted to me  from the book fair and I never got around to being able to read it to my kiddos since I moved out of the classroom, but the first grade teachers here borrowed it and said the kids LOVED it! yay!
This book is also a great read aloud for prepositions integrating Science as well! 

My kids loved this little preposition song/video as well:

We would also act out prepositions using teddy bear manipulatives and plastic cups/bowls:
"Put your bear under..."
"Put your bear on top of..."

Kids can also use their bodies:
"Stand next to your chair."
"Stand between..."


 Here is the little project I whipped up for them to do as a little wrap up of their learning, as a quick check to see if they truly understood how to use a preposition besides just identifying it, and for them to use as an interactive word wall (the kids do all the work and can go back and reference it later. It holds more meaning since they are the ones applying it and creating it!) This also integrates writing as well! 

Supplies needed: 
Animal Crackers
Crayons,Pencil,Markers (if preferred)
Glue
Construction paper or plain cardstock (personal preference)

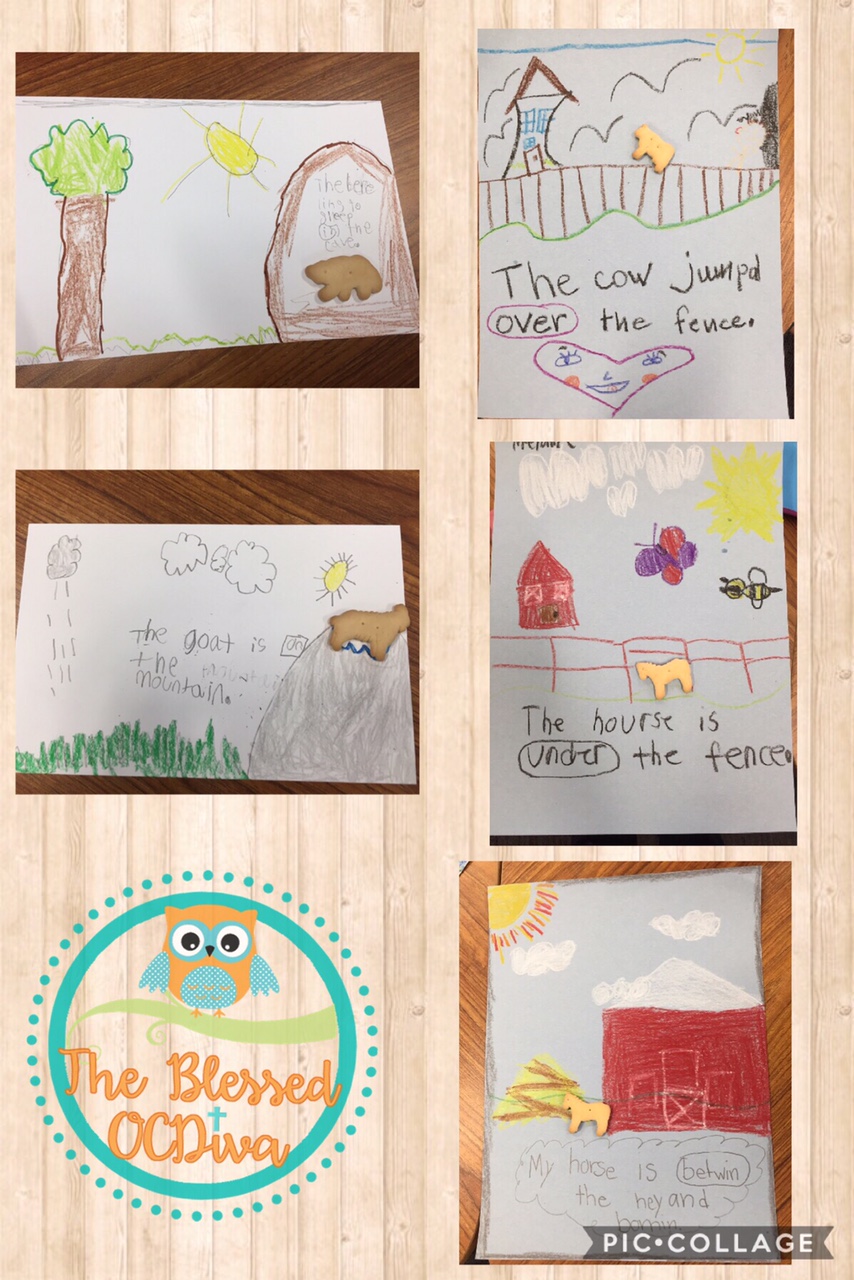
Students will get their blank piece of paper and an animal cracker. They will create a setting for their animal and then glue their cracker wherever they are choosing to use the preposition. They follow up with a sentence using the preposition and circling or highlighting the preposition they used! You could also elect for them not to highlight or circle and they can present theirs whole group or with a partner and the other kids have to find the preposition they used.
Look at these amazing products their kids created!! I loved being able to go into their classrooms and see it come to life! 

Here is a little video showing it as the full process!
Thank you Mrs. Tibbetts for letting me hover over your little friend ;)


I also created some fun packets to teach prepositions! There are 3 different themes! And one is a farm theme which goes perfectly with the above mentioned book and the animal cracker activity! 
Here is what is included in each pack:
It incorporates hands on activities as well as independent learning. Can be printed in B&W or Color! 

-interactive poster (background and character cut outs)
-anchor chart with list of prepositions
-student reference sheets for journals
-mini card anchor charts
-printables for practice or assessment
-mini booklets
-spin and cover game

Click HERE for Farm

Click HERE for Space

Click HERE for Ocean


Hope you saw a little something you can use the next time you introduce prepositions! 

Have a BLESSED week!

"Lord, you are my God; I will exalt you and praise your name, for in perfect faithfulness you have done wonderful things, things planned long ago."
Isaiah 25:1

Monday, July 22, 2019

Class Experts-Maintain minimal interruptions and build leadership


You're a teacher. 
You get asked a million and two questions a day. 
You are a broken record.
Comes with the territory.
We try so hard to model, train, and raise self sufficient students in our classrooms. 
It can be done. 

As a classroom teacher I wanted my kids to ask questions, truly. 
I loved to hear and see their inquisitive minds. 
However, I could have done without the "What do I do when I'm done?" question. 
Because let's be real, I am 110% sure I already covered that. 
Last year.
First day of school.
Last month. 
Last week.
Yesterday.
30 minutes ago.
30 seconds ago.

Enter the EXPERT chart! Cutting down on interruptions since 2012-ish. 

Now the amazing thing about this "Ask an Expert" chart is it can be modified for ANY grade, ANY classroom, ANY class, ANY teacher.


The anchor chart above is an example of some of the experts I used.  


Let's break it down:
Find or train a student who you know or have noticed is an "expert" or very reliable for a certain task in your room and you want them to be the contact person. Once they know the expectations for that "job" as the expert then they are the one who the other students go to when they have a question arise about that particular topic. Thus, cutting down interruptions for you while in small group, working one on one, conferring, etc! 

Example: 
Computer Expert- they knew how to turn on/off, log on, use headphones, get to assigned websites, etc. When another student needed assistance with the computer, instead of coming straight to me and interrupting small group they would go get the computer expert. 

What happens if the expert can't figure it out for some reason? Then the expert has permission to come ask me. It didn't happen very often and still cut back on interruptions overall. 

What are some possible expert categories?
-shoe tying
-bathroom
-computer
-ipads
-technology
-stations
-fire drill
-lunch
-I'm done
-class library
-office
-new student 
-recess
-ETC!

The list could go on and can be made to fit your needs! Have one or have many assigned experts.

I just made a chart, and once I found my experts I'd write their name (you could easily add kid's pictures too to help with any new comers, nonreaders, etc!)
I also sometimes buddied students up as experts on one topic. This helped with bigger jobs, but also gave more kids a chance to build responsibility in a safe environment. 

Experts can be changed out for new experts often or not, the choice is yours. Other students can choose to prove themselves responsible. 

There really isn't much to it, and really helped build leadership and responsibility within my students. (I used this strategy in first grade)

I hope you try the expert chart out this next school year and love it! 

Have a blessed week!!

"For the Spirit of God gave us does not make us timid, but gives us power, love, and self-discipline."
2 Timothy 1:7

Friday, July 12, 2019

Classroom Library Management

Classroom library. 
What comes to mind when I say those two words? Excitement? Stress? 
I know it can be a big topic for teachers when setting up their classroom and you yourself may have struggled at some point with setting up your library, kids checking out books, how will that work, etc...
I can tell you my first year I was all over the place trying different strategies.

Well 11 years later, lo and behold, I had found something that worked consistently for me and my kiddos! I don't always go based off the first year I try something new because it could go disastrous the very next year. I usually give it a bit to sink in, work out any kinks found early on, and let a few classes rotate through my doors to make sure I want to stick with that particular plan.

Once I finally got my library organized/labeled and found that system to have worked well, I then moved on to the "how" my kids would check out books. Being the control freak organized person  I am I wanted something that would not only help me keep up, but give some responsibility to my kids in an organized, manageable way. I did not want the class library to take control over our every waking minute since there are many other important things to accomplish during the year.

Enter the Library Shopping Cards!

An easy way to manage their checkout time. They are simple simple to use. 
1. Print on cardstock and laminate for durability.
2. Use a wet erase or even a sharpie to fill out once you know your kids reading levels and what their "just right books" would be.
3. Kids can keep them at their desks, in a book bag, or even stored in a jewelry hanger.


You fill in the information based off of what you want them to get when they visit the library.
As you teach them how to do it, they really take ownership of searching for the correct books without feeling smothered but also gaining some ownership in their choices, even with some teacher parameters. They also get the opportunity to choose "free choice" books as well, because their reading level does not define them as a reader-but we also know reading some books within their band of text is beneficial as well.


The wonderful thing is you can simply erase their info as they move up reading levels and the amount of books they can check out. It also divides them up during the week for their specific shopping days so they aren't all going at the same time.
Typically I had 3-4 kids on the same shopping day.

The levels I have on the cards are aligned to Fountas and Pinnell.

On a side note- I had two carts of books in my classroom library. Blue was the leveled books and Green was the free choice. I had written the level on the book in the top right corner of the books on the blue cart since these are the "just right books" they choose from.  (organizing a class library is a whole other topic and so many ways and prefernces teachers have)

 Green cart: The labels on each bucket have a number correlating to the number on the book. They are also divided up even further into categories:
-hard picture books
-soft picture books
-science (animals)
-science (earth) 
-SS (people)
-SS (land)
etc and so forth..
So when the kids needed to put one of the free choice books back all they had to do was look at the number label on the book and match it to the numbe ron the bucket. 


This has made it a ton easier to inventory when needed or when looking for a specific book. 

I really hope you find these helpful. Like I said, it worked consistently for first graders!!
Oh I also had a "Library Expert" who goes once or twice a week to check the bins and turn the books to spines out as needed. Takes the pressure off of me having to do this as well!


You can find the cards HERE
They are good K-3!

Side note: I am a huge advocate for math/science departmentalized teachers to also have some sort of classroom library set up. It does not have to be huge or expensive, but something so they can see the overlap of reading in all contents. You could even check out books from your school library and set them up around the room for a content topic you are teaching. They don't have to do the whole library shopping cards, but still have access to books other than just the ELA side. 


Thanks for popping by!

"Grace is having a relationship with someone's heart, not their behaviors."

Friday, March 8, 2019

Beauty Product Recommendations and Organization

Let me first start with a disclaimer...I am NOT a beauty blogger. This is not my forte- I barely can get my act together some days not to hit the snooze button 6 times.  I am not one to just walk into Ulta or Sephora and make it rain for new goodies. I actually have a hard time justifying spending money on trying new products. However, I have come to appreciate in my old age good, quality beauty products. Products that are as natural as possible and work well. So when I get a good recommendation or I find something that really works well I try to stick with it.

Today I am going to just outline a few of my favorite items I have found that I will continue to use as well as some helpful tips I personally use to organize as well! 


Organizing 101

 I recently did a purge of my bathroom and really went through every product and asked myself:
-Have I used this at all or even regularly?
-Is this a product I truly love?
-How natural is this product? ( I do try to stick as close to possible to natural as possible when I can)
-Is it expired and needs to just be replaced? 

Once I paired it down and had just what I wanted and needed I got to organizing it! 


Helpful Tip: Keep a sharpie in your bathroom and when you get a product that could expire, write the date you open and start using it. It helps me track how long I've had it, but also helps me track how quickly I go through certain things. It goes for makeup, haircare, body products etc! 

 I also do this for items in my kitchen (protein powder, essential oils, pantry items, etc- as needed) 


Now onto some recommendations! 
*I am not sponsored by anyone or anything- I am just sharing what I have found works for me and are cost effective :) *Pictures borrowed from google to show sample

You can get most of these items on Amazon or even your local Target, Walmart, Ulta, etc

Hair care


Revlon Hair Brush Dryer: Um get it now! It is perfect for shorter/medium hair lengths. I have never  mastered the art of blow drying with a round brush. I seriously think only the hair stylists can do it and maybe an Octopus.  This does it for me! It only takes me like 12 minutes now and it ends up smooth too! I don't have to use the straightener as fierce either-only really to shape the ends if needed.  I don't use it everyday because I am afraid of heat damage-even with protection. It does get kind of hot on the high level but also has a low and cool setting.  


Living Proof 5 in One: I actually love this for when I style and even when I air dry. I only use it on my mid-shaft to the ends of my hair. It helps add a layer of protection for drying but also keeps the frizz lower. And it smells good! :) I just pretend I look like Jennifer Aniston when I am using it.  


Body Care


Shea Moisture Coffee Scrub: If you like the smell of coffee and like to exfoliate your skin, then this stuff is for you! It is pretty natural and feels so good! It helps to exfoliate my skin, especially in the winter. It is small grounds so you may have to rinse the bottom of your shower after.


Shea Moisture Lotion (specifically Dragon's Blood scent)- I really like this brand, obviously. They are cruelty free, family owned, fair trade ingredients , and organic.  


Sulfer Ointment: My sister gave me a hint for this product. Love this for acne. I dab it on when I need it in specific spots and let it sit for about 10 minutes, wash off, and it really does help to dry up the spot and make it less irritated. I have even noticed that it helps either slow or stop the development of issues. I mean note to body- I am NOT 16 anymore....


Charcoal toothpaste: I can not say enough about this stuff! There are all kinds of products on the market for this, but I just love the ease of the paste versus powder. I seriously see results every time I use it. It tastes great (not that you eat it) and is effective! I don't use it in place of my normal toothpaste because it doesn't have flouride or cavity defense in it-it is all natural and I use it in the mornings.


Makeup

Again, I am not a full face makeup kind of gal- unless I am CosPlaying Wonder Woman or it is picture day at school. I typically only wear mascara, eyeliner, and some shadow. I don't own foundation. This is not because I have a flawless angel face, HA! I actually deal with adult acne-yay me. However, I just have never preferred having a lot of makeup on. Totally a personal preference. 
So these following makeup items I use religiously and they have proven to be worth my time and effort! 


IT Cosmetics Airbrush Perfecting Powder: I am loving this powder recently and will continue to buy it! I randomly happened upon it one day and thought I'd give it a try. I like that it is easily applicable, not heavy, but also has buildable coverage if needed.


Anastasia Brow Wiz (IT Cosmetics is a good dupe): both of these are awesome so far. One day I hope to get microblading done then I can really say "I woke up like this". Until then I like both of these- IT Cosmetics is a bit bigger width and is good for filling in. The Brow Wiz I buy is the smaller point and is good for outline and fine details.


ColourPop Super Shock Shadows: I just discovered this brand and LUUURRRVV it! It is made here in the good ole USA and the wear on these have been awesome so far! Not to mention the colors are poppin- even the neutrals are gorgeous! I tend to be a creature of habit when it comes to color. I like to say I will branch out and pretend to when I pin things on Pinterest, but let's be real-I am using the same color wheel over and over. ( the picture above is just a sample of colors they offer- if you go to their website www.colourpop.com they have a very large selection of colors.)


Tarte Paint Pot shadows: These bad boys (do you ever wonder about that saying, I mean why don't we say "these bad girls" I mean equal opportunity cliche sayings right?) anyways I digress. I like the fact that Tarte is pretty natural. Not a lot of added junk. They are pretty limited on colors for these particular shadows, however, these two below are amazing together. I get compliments all the time when I wear it. It is easy to apply (usually just with my finger) and it lasts me all day. (picture is not all colors offered) www.tarte.com

**Tip: I also use an eye primer anytime I put on shadow- it helps it go on smoothly as well as last throughout the day!


Eos mint lipbalm: Super exciting huh? I am trying to wear lipstick and/or colored lip shades- you know branching out. However, this stuff is great too! I love the flavor and it goes on so smooth. If you are looking for just a simple lip moisturizer this is a good one! I buy the two pack and keep one at home and one on the go! 


As always, I hope that you saw something that intrigued you while reading. Again, all of these items are things I have been loving for awhile and recommend if you are in the market.

Have a BLESSED weekend! 

"It is the same with my word. I send it out, and it always produces fruit. It will accomplish  all I want it to, and it will prosper everywhere I send it." 
Isaiah 55:11


Friday, February 22, 2019

Vertical Team Planning


I am going to jump right in today!
Horizontal & Vertical Alignment is the topic!  

What is horizontal alignment? 
Working within the grade level to align the content taught from one grade level classroom to the next (within the grade level).

Horizontal alignment does not have to stifle the creativity of teachers or even be a cookie cutter approach to teaching, but it for sure can lead to better communication among teammates/grade levels, ensure key concepts are taught in the classrooms, and allows each student access to the same content no matter the educator.  Horizontal alignment is naturally a bit easier to plan for (weekly plannings, ease of teammate access, etc).

If you are interested in how we horizontally plan long range within a grade level you can read about that HERE.


What is vertical alignment?  

According to Dr. Jason Perez curriculum alignment fills the gaps of learning from one year to the next. 

Vertical alignment can be daunting. When you are a grade level teacher, finding the time to jump in and study the grade level standards above or below  you can be almost nonexistent. I mean you are immersed constantly with planning for your own area and grade level. 
If you are on a campus that values vertical alignment and makes time for teams to meet consider yourself blessed. Carving out time to do this is essential and proves to provide gains for teacher's knowledge and ultimately carrying over to the students. 

Vertical and horizontal alignment are both pivotal in making sure the full picture is attained and students are getting the full scope of  learning from grade level to grade level.   


At our campus we have quarterly meetings for vertical teams (ELA/Math) to get together and work/discuss.  Today I am going to share just one way we provided vertical alignment for all teachers K-5 this year. 


Step 1: 
Choosing the focus TEKS
My IC partner and I pulled data for 3-5 to look and see which TEKS to hone in on based off of scores (lower performing). For ELA it happened to be the Poetry Reading TEK and for Math it was Geometry. 
Once we identified the TEKS we were using, we typed them up on one document to share with the teachers at our whole campus professional development day. 


Step 2: 
Whole Campus PD Day
All K-5 teachers, along with SPED and in class support  met on this day with us to walk through looking at the designated TEKS for ELA and Math. 
We shared the TEKS we chose with everyone and then gave each team a large chart paper. They had about 20-25 minutes to collaborate and chart out how they teach and assess that TEK.
Once the allotted time was up, we had them display their charts by content and grade level throughout the hallway. One team member from each grade level stayed with their poster to be the spokesperson. We then had them do a gallery walk to each poster within their content to see how that grade level teaches and assesses that particular TEK (we gave about 5 min per poster).

( I was not able to get pictures of all the math posters in time-sorry!!)


                                                           KINDER                                                                          

This is an example of Kinder Math


FIRST


SECOND

THIRD

FOURTH

 FIFTH


The teachers really enjoyed seeing how the TEK progressed from Kinder all the way through 5th and even gained new insight to how they can help support the grade level above them and build on the grade level below them. 

Fast forward two weeks later, we had a PDR meeting with all grade levels at their planning time to follow up. 

Step 3: 
Combine grade level assessments
My IC partner and I asked each grade level to submit a copy of an assessment they give in their unit addressing the TEKS we identified above. Once we received all assessments K-5 we made copies as a packet for each grade level to be able to make notes in the PDR. 


Step 4: 
PDR Day-Review all assessments
I mean who wouldn't want to analyze assessments with this spread ;) 

Day of the PDR we gave each team the packet of vertical assessments along with a pen that is their grade levels designated color. (EX: 5th grade is green, 4th grade is purple, etc) As a content team, they started at Kinder and worked their way through each grade level looking at each assessment answering the following questions:
1. How does the learning from this grade level support my students?
2. What gaps can you identify from grade level to grade level?
3. Is the assessment aligned to the TEK?


*note- all feedback given on each document was anonymous- the color coding was mainly for us as IC's to separate feedback later on. 

I really enjoyed sitting and listening to the conversations among teachers. We  had a lot of realizations and many compliments to the teams below and above. They were really able to see the impact of why vertical alignment in teaching/assessing the TEK is so important.

For teachers, when you are many times sucked into your own world and grade level it was an eye opening realization. It also forced home for us as IC's to be diligent throughout the year when in plannings with teams to continue to spiral and guide the teachers in creating/planning for their units. 

Step 5: 
Gather feedback
We will now gather the feedback and take that (again anonymously) to teams to help them tweak their assessments as needed for next year. We are making a goal for next year to do at least one PDR per month utilizing this same structure for the various units taught. 

Do you need more info or guidance on making sure you are vertically aligning? If you are in Texas here are two places you can go!

I hope this helped even in the slightest! 

Have a BLESSED weekend!
"So let's not get tired of doing what is good. At just the right time we will reap a harvest of blessing if we don't give up. 
Galatians 6:9

Friday, January 25, 2019

Organization: All Things Kitchen (Tips and Tricks)


How many of you made a New Year's resolution to become better organized?  The New Year is a great time to reassess your surroundings, clean and clear out! Just something about starting the year fresh and re calibrate.

I am one of those people who has always continuously been a purger by nature. I'm pretty sure I came out of the womb organizing all the things. You may be laughing at that statement, but I am totally serious- it is ingrained in me. I have never enjoyed having a ton of "stuff" surrounding me (unless it is books of course). I feel so clean and free when everything has a place and when I can purge things that are not being utilized. 

Well, if you weren't born color coding and need some ideas and guidance on how to get organized then hopefully this little organizing feature will give you some inspiration and some motivation.

What's up? All things kitchen! 

Here are my go to tips when starting your kitchen organization project!

1. Start small- pick one spot at a time to tackle. 
I think what happens a lot of times is people get overwhelmed when organizing. They feel like they have to do it all at once. You don't. 
Choose ONE space to start with (pantry, drawers, cabinets). 

2. Once you choose your first spot, take EVERYTHING in that space out and lay it out so you can see everything you have. 

3. Touch each item and ask yourself some questions: 
-Is it being utilized?
-How often?
-Could I survive without it?
-Does it go with another item to work together?
If you determine you will not be keeping it, decide if it is worthy of trash or giveaway. (you will also want to have a trashcan and a box for donations close by when you are going through this process.)


4. Use bins to organize what is left. 
Once you have paired down your items, when you are putting your items back into the drawer, cabinet, area...organize it as you put back! One way I have found that really helps me keep it organized long term and helps me to always see what I have so something doesn't get "lost" in the shuffle of everyday life is having little bins and baskets. Organizing the left overs into these things will be a game changer for you I promise! 
So you may want to take measurements of your space to know how many bins/baskets you will need and will fit.

Don't forget- group like things together in the baskets and bins!


5. Add labels (where applicable) 
As I said above, I was born basically labeling all the things. When necessary color coding the labeling ha! Now you may not need to label everything...you will see in some of  my pictures I don't label everything, mainly because I can easily see what is in the basket and there is not a convenient spot to place a label. I do not have ANY positive experience trying to hand write my labels. Now if you have beautiful handwriting then by all means make it pretty! Otherwise, I either type out labels or use my Silhouette machine to cut labels. 


Pantry Specific: 
I have really found that once I have organized the pantry and created specific bins and baskets, when I go to shop I don't overbuy things. I don't know if it is a mindset placebo effect or not, haha...but I am less likely to shop for unnecessary things because it won't have a home once I get back to unpack it. I also unbox things that are individually wrapped. This helps to condense things and helps the items fit into the baskets and bins better.


These are just a few of my tips that have helped me over the years. You can use the same process when cleaning and organizing just about any space in your house! 
I hope you found this helpful! 

Have a BLESSED week! 
"Share each other's burdens, and in this way obey the law of Christ."
Galatians 6:2